Thursday, May 23, 2019

References Vs Pointers

Pointers

  • Points to a memory address
  • Can be reassigned
  • Can be null or nullptr
  • Access its contents by using a * in front of the pointer I.E. *ActorPtr
  • Access the address like so ActorPtr
  • You can change the address of the pointer like so ActorPtr = &Actor
  • You can change the value of the pointer like so *ActorPtr = Actor

References

  • Stores a memory address
  • Cannot be reassigned
  • Cannot be null and must be initialised
  • You can access the contents of a reference like so ActorRef
  • You can access the address of a reference like so &ActorRef
  • Since a reference cannot be reassigned, you cannot change its memory address
  • You can change the value of the reference like so ActorRef = Actor


The & And * Symbols In Context

When using a pointer and there is a * in front of it, the * allows you to access the content of the pointer, this is also known as dereferencing. An example of this is CopyOfActor = *ActorPtr. When using a variable/reference and a & is in front of it, you are accessing the address of the reference. For example, ActorAddress = &Actor.

However when both symbols have different meaning when used with a type to declare a variable. With the * symbol you are declaring a pointer to some type, for example, UActor* ActorPtr. This means you have created a pointer that will point to a UActor. With the & symbol you are declaring a reference to some type, for example, UActor &ActorRef. This mean you have creaated a refence to a UActor.


Example Demonstration Code

Visit - https://onlinegdb.com/ByP5XeNa4 and run the code.


Pointers Or References?

  • The golden rule is to use references unless you can't
  • References are newer and safer
  • Pointers provide back-compatibility
  • Pointers are more powerful
  • Pointers are more dangerous

"With Great Power Comes Great Responsibility" - Uncle Ben

Thursday, May 9, 2019

UE4: Properties

Coming from a Unity background, you can have private variables in a class but by assigning various properties like [SerializedField] or [Multiline] we can modify them in the inspector in some way (see post here). The Unreal Engine has a similar method that uses the UPROPERTY() macro, which can be used to do similar things.

For example, the UPROPERTY(VisibleAnywhere) allows the variable to show up in the inspector but is not modifiable, whereas the UPROPERTY(EditAnywhere) allows the variable to be visible in the inspector but also can be modified.

To use the UPROPERTY() macro in a class you must use the macro above the variable in question and make sure that there are no white spaces between UPROPERTY and the brackets. An Example is below.

class SomeClass
{
public:
    SomeClass();

private:
UPROPERTY(EditAnywhere)
FRotator openRotation = FRotator(0.f, 90.f, 0.f);
}

There is more detail on each of the specifiers which can be found here.

Unity C#: Properties

Unity allows developers to use property attributes to modify how a class instance looks within the inspector. Here are some of them and how they work.

[Header("Some Header")]
Header allows you to title a set of variables so if you had a string for the characters name and a string for their description you can place a header attribute above them to signal to anyone that those variables are specifically for a character's description, then use another header attribute for the character's movement stats.

[Tooltip("Some Tip")]
Tooltip allows you to display a tip within the inspector to help explain any variable viewed in the inspector. This is especially useful if the naming of the variable is confusing or could possibly be confused with another variable.

[ContextMenu("Some Menu Name")]
Context Menu allows you to call a function defined within the class from the inspector and can be used to check the functionality of a function without going into play mode in the editor. This attribute is placed above the function that would be called. An example of this would be a TakeDamage() function that in game would be called if the player/character gets hit. Adding a context menu attribute allows that TakeDamage function to be visible in the inspector and allows you to check that the function works as expected due to being able to see the characters health decreasing when called.

[Multiline]
The multiline attribute modifies the text field of a string to be a text area instead, providing more room to write and as the name suggests use multiple lines. This attribute is useful for things such as character/level descriptions.

[Range(min, max)]
The range attribute creates a slider for the variable attached to and requires a min value and a max value. An example use of this would be for a damage per second variable, where you can adjust that value using the slider instead of typing a value in.

[ContextMenuItem("Some Menu Item Name", "Some Function Name")]
Context Menu Item works similar to the context menu attribute but is specific to a variable aka the one below said attribute. This will then call a specified function when clicked on within the inspector. An example of this would be a characters health, which has a context menu item that calls the TakeDamage function from earlier. Another could be added that can then be used to call a GainHealth function, which gives the character more health.

[CreateAssetMenu(fileName = "Some File Name", menuName = "Some Menu Name", order = Some Number]
Create Asset Menu is particularly useful when creating scriptable object classes. This attribute allows you to create a scriptable object file within the project view. This attribute goes above the class definition.
For Example:
[CreateAssetMenu(fileName = "Gun Stats", menuName = "ScriptableObject/Guns/Stats", order = 1]
public class GunStats : ScriptableObject
{
  public float reloadRate;
}

[Space]
The space attribute added a gap between two variables being displayed within the unity inspector.

Wednesday, April 17, 2019

Unity C#: Dictionaries

A dictionary is similar to a list but with a few advantages and a disadvantages, where the dictionary is not displayed in the editors inspector windows (although this can be overcome through Unity packages like the Odin Inspector or by writing your own custom inspector). A dictionary is a list of pairs, where each pair is made up of a key and a value. This is where the dictionary becomes faster than a list. In order to find a value within a list, you have to loop through all of the elements. However with a dictionary, you just give it the key that is associated with the value you want.

[System.Serializable]
public class Item()
{
string name;
ItemType itemType;
int itemId;
string itemDescription
}


public class TestClass : MonoBehaviour
{
// Defining a dictionary
private Dictionary<int, Item> itemDictionary = new Dictionary<int, Item>();

private void Start()
{
// Create new item
Item shield = new Item();
shield.name = "Shield";
shield.itemType = ItemType.Shield;
shield.itemId = 0;
shield.itemDescription = "Something to block attacks with";

// Add the first item to our dictionary
itemDictionary.Add(0, shield);

// Access the first item and display the name of the item in the console log
Debug.Log("First Item: " + itemDictionary[0].name);
}
}

Adding values to a dictionary is similar to a list but with one minor change, you have to provide a key with the value that you want to add. Accessing an value is also similar to a list but instead of using an index, you use the key associated with the value you want.

Looping Through A Dictionary

You can loop through a dictionary using a foreach loop, but there are three ways you can write that loop. The first being as a KeyValuePair, the second being just the keys and the third being just the values. Below are examples of all three loops.

[System.Serializable]
public class Item()
{
string name;
ItemType itemType;
int itemId;
string itemDescription
}


public class TestClass : MonoBehaviour
{
// Defining a dictionary
private Dictionary<int, Item> itemDictionary = new Dictionary<int, Item>();
private void Start()
{
// Create new item
Item shield = new Item();
shield.name = "Shield";
shield.itemType = ItemType.Shield;
shield.itemId = 0;
shield.itemDescription = "Something to block attacks with";
// Add the first item to our dictionary
itemDictionary.Add(0, shield);
// Create new item
Item sword = new Item();
sword.name = "Sword";
sword.itemType = ItemType.Sword;
sword.itemId = 1;
sword.itemDescription = "Something to attacks with";
// Add the second item to our dictionary
itemDictionary.Add(3, sword);
// Create new item
Item helmet = new Item();
helmet.name = "Helmet";
helmet.itemType = ItemType.Armour;
helmet.itemId = 2;
helmet.itemDescription = "Something to put on your head";
// Add the third item to our dictionary
itemDictionary.Add(6, helmet);
// Loop through dictionary using KeyValuePair
foreach(KeyValuePair<int, Item> entry in itemDictionary)
{
Debug.Log("Key: " + entry.key);
Debug.Log("Value: " + entry.value);
}
// Loop through dictionary using Key
foreach(int key in itemDictionary.keys)
{
Debug.Log("Key: " + key);
}
// Loop through dictionary using values
foreach(Item item in itemDictionary.values)
{
Debug.Log("Value: " + item.name);
}
}
}

Note that it is possible that all keys are not going to be sequential as demonstrated above. Also all keys should be unique, but there can be duplicate items. You can also check if a dictionary has a key by using the ContainsKey() function, this stops any exception errors due to missing keys.


Tuesday, April 16, 2019

Unity C#: Static Types

Like with most programming languages, C# has a static keyword that can be used on classes, variables and functions. By using the static keyword, that class, variable or function is available for the lifetime of the game. It's worth noting that if you create a static class, it cannot inherit from the MonoBehaviour class but also that all variables and functions must be static.

Static Members Verses Instance Members

Besides being a member that is available throughout the lifetime of a game, a static member is available to all instances of a class. Instance members on the other hand are different because they are specific to that instance of a class. For example, you have an enemy ship class, that class might have a health member. Generally this type of member would be an instance, as you would want each ship to have a unique amount of health. An example of a static member for an enemy ship class would be a shipCount, which keeps track of how many ships there currently are. With this you don't want each instance of the class to have a unique value for this member, so it would be static.

public class EnemyShip()
{
public EnemyShip()
{
shipCount++;
}
public int health;
public static int shipCount;
}


public class TestClass : MonoBehaviour
{
private void Start()
{
EnemyShip shipOne = new EnemyShip();
shipOne.health = 10;
EnemyShip shipTwo = new EnemyShip();
shipTwo.health = 5;
Debug.Log("Ship Count: " + EnemyShip.shipCount);
}
}

Static Constructor

A static constructor can be used to initialise any static members within a class. This constructor will only be called once unlike the constructors we usually use. It will also be called first before any of the instance constructors.

public class EnemyShip()
{
public EnemyShip()
{
shipCount++;
}
static EnemyShip()
{
shipGroup = "Atlas";
}
public int health;
public static int shipCount;
public static string shipGroup;
}


public class TestClass : MonoBehaviour
{
private void Start()
{
EnemyShip shipOne = new EnemyShip();
shipOne.health = 10;
EnemyShip shipTwo = new EnemyShip();
shipTwo.health = 5;
Debug.Log("Ship Count: " + EnemyShip.shipCount);
}
}

In this example the static constructor is used to set the ship's group to "Atlas", as this is static, all enemy ships will have the same ship group value and is done once before the instance constructors. 

Wednesday, March 27, 2019

Asymptotic Notations Pt 2

Big O Notation
With the Big Theta notation we bound the growth of a runtime within a constant upper and lower factor. However, there are some times where we want to bound that growth to the upper factor. This is where the Big O notation comes in to play.

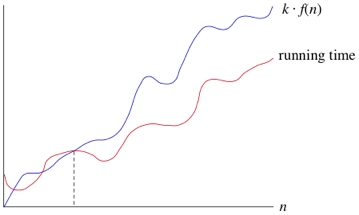
With binary search the worst case scenario is 𝛉(log2(n)), however, this is not the case 100% of the time as it is possible to find the target value on the first try which would make the runtime 𝛉(1). Therefore you can say that the runtime of binary search is never worse than 𝛉(log2(n)) but can be better. How would we write this using asymptotic notations, well we would write O(log2(n)).

6n^2 vs 100n+300

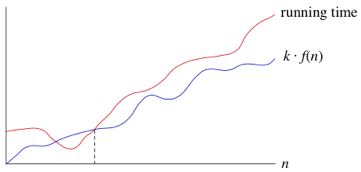
Like with the big theta notation once n becomes large enough it is less than or equal to k * f(n), the big O notation can be used. Of course the Big O notation can also be used on any function and not just a logarithmic function.

Big Omega Notation
Sometimes we instead want to say that a runtime will take at least a certain amount of time, but without providing an upper bound. This is where the big omega notation comes into play. This means any function where n becomes large enough and is greater than or equal to k * f(n).


The Big Theta notation implies both Big O and Big Omega notations, but both Big O and Big Omega notations are imprecies due to not using both bounds. With this imprecision it is best to use Big Theta when describing a runtime of an algorithm.

Asymptotic Notations Pt 1

The runtime of any algorithm is decided by various factors such as the speed of the computer, the programming languages used, how long it takes for a compiler to translate the programming code into machine code and more.

We can think of the runtime of an algorithm as a function of the size of it's input. The makes sense when you look at linear or binary search algorithms because they take longer as you increase the size of the array that you are searching through.

We also need to think about the growth of the function as the size of the input increases, which is often referred to as the rate of growth. To make things more managable we simplify the function. This means removing the less important parts from the function. For example; we have the function 6n^2 + 100n + 300, where n is the size of the input. At some point the 6n^2 part of the function is going to become greater than 100n + 300 part, this actually happens when n = 20. Therefore we can get rid of the 100n + 300 part. We can also remove the 6 coefficient part of the 6n^2. This is because as long as the coefficient is > 0 then the difference will increase as does n. So we can say that the function grows as n^2.

By dropping the less important parts we can completely focus on the rate of growth of an algorithms runtime. When we do this we use asymptotic notations. Three examples of these types of notations are the big theta (𝛉), big O and big omega (𝛀).

Big Theta
As mentioned before the runtime of an algorithm is made up of various factors (some listed above) this will be denoted as c1. Then we have the input size or number of loop iterations, which is denoted as n. Finally we have the overhead of a function such as initialising the index to 0, this is denoted as c2. Using these values we can calculate the total time for the worst case scenario (which in a linear search is not finding a value). The formula is c1 * n + c2.

Both c1 and c2 don't tell us anything about the rate of growth of the runtime. The important part is n and so because both c1 and c2 are also constants we can drop both of them. Therefore the notation we use for the worst case scenario of a linear search is 𝛉(n).
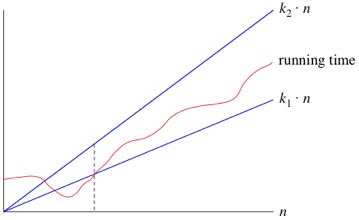
What this means is when n is large enough, the runtime is greater than k1 * n and less than k2 * n, where k1 and k2 are some constants. This can be seen in the graph below.


We can also use other functions of n, such as n^2 or nlog2. Therefore as long as any runtime that uses some function of n, f(n), is greater than k1 * f(n) and is less than k2 * f(n), it is a big theta notation or in other words 𝛉(f(n)).

Another advantage of using these notations means that we don't have to note the time units being used. So the previous example of 6n^2 + 100n + 300, becomes 𝛉(n^2). When we use this notation we are saying we have a asymptotically tight bound on the runtime. This is because it only matters when n is large enough (this gives us the asymptotically part) but also because the runtime is between the two k constants * f(n) (this gives us the tight bound part).

Growth Characteristics
There are 6 typical types of growth; constant, logarithmic, linear, linearithmic, polynomial and exponential, however, there are other types of growth that might not be covered.

An example of a constant growth is finding the first element within an array. The function would be 1 as element 0 is always the first element. An example of an logarithmic function is Log2(n). This means how many 2 we need to multiply to get n. Linear is where n (the size of the input) is multiplied by some sort of coefficient, for example 3n would have a linear growth. Linearithmic is a combination of logarithmic and linear functions. An example of this is nLog2(n). Polynomial is similar to linear but this time n has a power/indice that follows after it. For example 3n^2 or n^6. Finally there is exponential and this is where some number has an indice of n, for example (3/2)^n or 6^n.

The order of growth is:

  1. Constant
  2. Logarithmic
  3. Linear
  4. Linearithmic
  5. Polynomial
  6. Exponential
Its worth noting that with logarithmic and linearithmic functions the growth speed is dependant on the base, the lower the base value the quicker the growth. For example log2(n) is faster than log8(n). With polynomial and exponential functions, the higher value the power/indice is the quicker the growth. So n^2 is slower than n^4.


Friday, March 1, 2019

Precompiled Headers In C++

Usually when you include a header file in any C++ file, all of the contents of the header file is copied and compiled into the C++ file. This isn't so bad for a single header file, but if the header file also included several other header files, they also have to be compiled. So if you have a large project, you can expect the compile times to be very long without using precompiled headers. By precompiling headers, it converts a set of headers into a single file that uses the binary format in which the compiler can read and this is only done once. This however doesn't work if you add header files that you will be constantly or even occasionally changing as it means that the precompiled header now has to be recompiled every time a change is made.

Precompiled headers are usually used for headers that are going to be used often throughout the project such as the standard libary or any external libraries that you might be using. This is because they aren't going to change (unless there is a major issue with a version of an external library, which causes you to update that library). You can also use it for your own libraries but as mentioned above it is only worth doing if that library you have created is complete and isn't going to change or isn't likely to change.

There is a disadvantage to using precompiled headers and that is that it can hide the dependancies of a C++ file. Normally by just including whatever header files in a C++ file, you can easily tell what it requires. This means that if you were to reuse that C++ file within another project, you already know what else you will need if you don't already have it within that project. However, this is not the case with precompiled headers as it most likely has a ton of header files that are being used throughout the project but not specifically for the C++ file that you want to reuse. Therefore, if you did reuse that file you would have to figure out the header files that the file depends on.

Also if you are only going to use a header file in a single C++ file then it is not worth adding to the precompiled headers file. This is because that header file is more than likely going to be abstracted into your own api for you to use. An example of this would be the GLFW header file.

Below is a useful video on the subject, in which these notes are based on, but also the set up needed to use precompiled headers within a C++ project.

Thursday, February 14, 2019

Enums Vs Enum Classes Pt 1

Enums and enum classes are essentially the same thing, however, using enum classes can avoid a compiler error as well as some other issues that maybe discussed in later posts.

enum AEnum
{
    OK,
    FAILED,
}

enum BEnum
{
    READY,
    FAILED,
}

The above enums will cause a compiler error and this is because within both enums the value FAILED has been declared twice as both values are within a global scope. By using enum classes instead avoids this problem as each value declared is now within its own enum class scope. A enum class is also known as a strongly typed enum. The below code shows the correct usage of enum classes. NB: Enum Classes are available in C++ 11+.

enum class AEnum
{
    OK,
    FAILED,
}

enum class BEnum
{
    READY,
    FAILED,
}

Monday, February 11, 2019

The Const Keyword: Const Functions

Const is generally used to state that something will not be changed or modified. However, this is dependant on where const is placed. For example if you place the const keyword after a member/class function declaration, you will not be allowed to modify any member variables within that function.

int GetMaxTries() const;

int GetMaxTries() const 
{
    return maxTries; 
}

The above function and function declaration will not produce any compiler errors as it doesn't modify any of the class's member variables. However, the below example would, because even with the const someone has tried to modify the maxTries variable. The const keyword in this situation acts as a guard so that you or anyone else working on the codebase doesn't accidentally modify any member variables within a specific function.

int GetMaxTries() const;

int GetMaxTries() const 
{
    maxTries += 12;
    return maxTries; 
}

Structs Vs Classes

Simply put structs and classes are the same except for one factor, which is, that all member variables and functions are public by default. This can be extremely useful. Below is an example of what a struct might look like and what a class might look like.

Struct Example

struct SomeStruct
{
    int someIntVariable;
    std::string someStringVariable;

    void SomeFunction();
}

Class Example

class SomeClass
{
public:
    SomeClass();
    ~SomeClass();

    void SomeFunction();
    int GetSomeIntVariable() { return someIntVariable; };

private:
    int someIntVariable;
}

Friday, February 1, 2019

Matrices Pt 3

Augmented Matrices
An augmented matrix is a matrix made of several linear equations that make up a system of equations. Each row of the matrix represents a equations within the system, whereas each column of the matrix represents a variable wtihin that equation.

We can see this with the above example, where we have two equations within a system and a matrix representation of that system. It also shows how the columns represents each variable or constant within the equation. For the x variables we have both 2 & 3, for y variables we have 5 & 4 and for the constant we have 10 & 24. This means we can write equations without having to write the x or y letters, or any other letters that might be used.

When converting a system of equations to a matrix, we need to make sure that each variable and constant is in line with each other but also if a variable or constant doesn't exist in one equation of the system then it defaults to 0 within the matrix at the location where the value would have gone.


Matrix Row Operators
There are three types of matrix row operators:

  1. Switch any two rows
  2. Multiply a row by a nonzero constant
  3. Add one row to another
You will know to switch two rows of a matrix when given a question like R1 ↔ R2, which means swap row 1 with row 2. It is important to note that you can also subtract if needed.


You will know to multiply a row of a matrix by a nonzero constant when given a question like 3R1 → R1, which means multiply row 1 by 3. It is also important to note that you can essentially divide by a nonzero constant as well by using fractions like 1/2.


You will know to multiply a row of a matrix by a nonzero constant when given a question like R2 + R3 → R2, which means add row 2 to row 3 and enter the answer in row 2.


Each row operator could also be represented in this format:


On the left side we have the original matrix, in the center is the row operator and the direction being to the final matrix, which we can see on the right side.

It's also worth noting that they can be combined.


Notice how the 2R3 part only applies to the addition in row 1 and is not used to modify row 3.

As mentioned before augmented matrices represent a system of equations. By using row operators we can get equivelent systems of equations. For example by using the mutliplaction by a nonzero constant we can eliminate a variable from an equation.


This is our original system of equations and the augmented matrix. If we carried out -2R1 → R1, we get:


This then allows us to use the row addition operator; R1 + R2 → R2, which gives us:


In other words, we get the final equation -1y = -4, which we can use to solve for y. So y = 4, which can then be subsituted in any of the equations to solve for x.

Reduced Row Echelon Form
You can solve a system of equations by converting the augmented matrix into the reduced row echelon form. This form is were the diagonal components of a matrix are valued at 1 and every other component is valued at 0, except for any constants. Think of it being a combination of the identity matrix and an augmented matrix. Below is an example, where a, b & c are the constants.


To get to the reduced row echelon form, can use the row operators from earlier.


Once a augmented matrix has been converted we can solve the system of equations. So using the above example we can see that x = 5, y = -1 & z = -1 and if we subsitute them back into the original equations we can see that everything is correct.

1x + 1y + 1z = 3

1(5) + 1(-1) + 1(-1) = 3

5 - 1 -1 = 3

Thursday, January 24, 2019

Design Patterns: Command Pattern Pt 1

The Gang of Four describe the command pattern as "Encapsulate a request as an object, thereby letting users parameterise clients with different request, queue or log requests, and supports undoable operations."Another way to describe it as a thingified method call, which means to wrap a method call in a function.

The command pattern is very similar to callbacks, first-class functions, function pointers and partially applied functions. The Gang of Four also describle commands as an object oriented replacement for callbacks.

An example use for the command pattern is configurable/remappable input, what this means the user can change what actions a button/bumper/trigger can do. Usually specific actions are mapped to specific input like so:

void InputHandling()
{
    if (Input.GetButtonDown(BUTTON_X))
    {
        Reload();
    }
    else if(Input.GetButtonDown(BUTTON_Y))
    {
        SwapWeapons();
    }
    else if(Input.GetButtonDown(BUTTON_B))
    {
        Melee();
    }
    else if(Input.GetButtonDown(BUTTON_A))
    {
        Jump();
    }
}

We could set up preset functions that contain different variations of the type of input and corresponding actions. However, that might not be flexible enough and so allowing the players to swap out actions is a better alternative, which is where commands come in. We can use pointers for each button and when the player wants to change that buttons input we simply point to a new command object.

Example Code

Command Class
class Command
{
public:
virtual ~Command() { };
virtual void Execute() = 0;

};

Example Command Classes
class JumpCommand : public Command
{
public:
virtual void Execute() { Jump(); }
};

class MeleeCommand : public Command
{
public:
virtual void Execute() { Melee(); }
};

class SwapWeaponsCommand : public Command
{
public:
virtual void Execute() { SwapWeapons(); }
};

Input Handler
class InputHandler
{
public:
void HandleInput();

// Methods to bind commands

private:
Command* buttonA;
Command* buttonB;
Command* buttonX;
Command* buttonY;

};

void HandleInput()
{
    if (Input.GetButtonDown(BUTTON_X))
    {
        buttonX->Execute();
    }
    else if(Input.GetButtonDown(BUTTON_Y))
    {
        buttonY->Execute();
    }
    else if(Input.GetButtonDown(BUTTON_B))
    {
        buttonB->Execute();
    }
    else if(Input.GetButtonDown(BUTTON_A))
    {
        buttonA->Execute();
    }
}

However, this assumes that whatever functions that are wrapped in the execute functions as part of the command class, can find the player to do whatever action is required. This isn't always the case and so we can modify the code so that we pass in a reference to an object and then call a specific function of that object. This means we now make these changes to the code:

class Command
{
public:
virtual ~Command() { }
virtual void Execute(Actor& actor) = 0;
};

class SwapWeaponsCommand : public Command
{
public:
virtual void Execute(Actor& actor) 

actor.SwapWeapons(); 
}
};

Command* HandleInput()
{
    if (Input.GetButtonDown(BUTTON_X))
    {
        return buttonX;
    }
    if(Input.GetButtonDown(BUTTON_Y))
    {
        return buttonY;
    }
    if(Input.GetButtonDown(BUTTON_B))
    {
        return buttonB;
    }
    if(Input.GetButtonDown(BUTTON_A))
    {
        return buttonA;
    }

    return NULL:
}

You will notice that we now return the commands, this is because we don't know the actor to execute functions from and so once we know the command, we can pass in the reference to the actor, to the command. Like so:

Command* command = HandleInput();
if (command)
{
command->execute(actor);

}

This also means we can actually control any actor within the game, as we can just swap out which actor is passed in to the execute function.

Number Systems: Introductions

Number systems allow us to count various things with a lot more ease than before. The most common one is Decimal or Base 10, this is most likely because humans generally have 10 fingers, 5 on both hands.

Base 10
Base 10 uses 10 symbols: 0, 1, 2, 3, 4, 5, 6, 7, 8, 9
This combined with places allows us to use large numbers such as 231.
If we split 231 down we get:
  • 2 x 100s
  • 3 x 10s
  • 1 x 1s
It is interesting to note that each place increases a multiple of 10, but also can be explained exponentially so:
  • 1 = x10^0
  • 10 = x10^1
  • 100 = x10^2
  • 1000 = x10^3
Base 2 - Binary
Base 2 uses 2 symbols: 0, 1
These usually represents on and off or true and false.

Instead of each place being represented by x10^n, base 2 places are represented by x2^n.
So the first 8 places of binary are:
  • 1 = x2^0
  • 2 = x2^1
  • 4 = x2^2
  • 8 = x2^3
  • 16 = x2^4
  • 32 = x2^5
  • 64 = x2^6
  • 128 = x2^7
We can now convert 231 base 10 into base 2

128 64 32 16 8 4 2 1
---------------------------
    1   1   1   0 0 1 1 1

So in binary 231 is represented as 11100111 and we can check this by adding each place that has a value of 1: 128 + 64 + 32 + 4 + 2 + 1 = 231


Base 16 - Hexadecimal
Base 16 uses 16 symbols: 0, 1, 2, 3, 4, 5, 6, 7, 8, 9, A (10), B(11), C(12), D(13), E(14), F (15)

As with base 2, base 16 places are represented by something different to x10^n. The places are represented by x16^n. So the first 4 places of base 16 are:
  • 1 = x16^0
  • 16 = x16^1
  • 256 = x16^2
  • 4096 = x16^3
We can now figure out how to write 231 in base 16

4096 256 16 1
-------------------
                  E 7

So in base 16, 231 can be represented as E7 and we can check this by adding the each places total together.
E or 14 x 16 = 224
7 x 1 = 7. 
224 + 7 = 231

Sample Problem: C++ - Order of Execution of Constructors & Destructors Between a Parent & Child Class

You have a parent class that has a constructor and a non-virtual destructor, as well as a child class that inherits from the parent class. What is the execution order for the constructors and destructors?


  1. Parent constructor is called
  2. Child constructor is called
  3. Child destructor is called
  4. Parent destructor is called
Source Code
Source.cpp
#include "Parent.h"

#include "Child.h"
#include <iostream>

int main()
{
Child* testChild = new Child();
testChild->~Child();

int endInput;
std::cin >> endInput;

return 0;
}

Parent.h
#pragma once
#include <iostream>

class Parent
{
public:
Parent();
~Parent();
};

Parent.cpp
#include "Parent.h"

Parent::Parent()
{
std::cout << "Parent Constructor Called" << std::endl;
}

Parent::~Parent()
{
std::cout << "Parent Destructor Called" << std::endl;
}

Child.h
#pragma once
#include "Parent.h"
#include <iostream>

class Child : Parent
{
public:
Child();
~Child();
};

Child.cpp
#include "Child.h"

Child::Child()
{
std::cout << "Child Constructor Called" << std::endl;
}

Child::~Child()
{
std::cout << "Child Destructor Called" << std::endl;
}

Console Output


Wednesday, January 23, 2019

Matrices Pt 2

If you haven't read part one, it might be a good idea as it goes over the basics of matrices.

Multiplication
You can think of calculating the matrices multiplication by thinking in terms of vectors and dot products, For example, you have matrix A and matrix B, both are a 2x2 matrix, you want to multiply the two together to get matrix C. The top left value of matrix C is equal to the dot product of the first row of matrix A and the first column of matrix B. Then to get the top right value of matrix C, you do the same but using the second column of matrix B. The bottom two values of matrix C can be calculated in the same before but using the second row of matrix A.


Of course this scales upwards so if you have two 4x4 matrices, the working out is still the same as before. Multiplication doesn't require both matrices to have the same dimensions, although it does require the number of columns in matrix A to be the same as the number of rows in matrix B.


It should be noted that matrix multiplication is note commutative, however, it is both associative and distributive over addition. Also if a matrix is multiplied by the identity matrix then the matrix stays the same. You can also calculate the identity matrix by multiplying a matrix by its inverse.

Matrix Multiplication Properties
  • A * B ≠ B * A - This means that it isn't communative
  • A * (B + C) = A * B + A * C  - This means that it is distributive
  • A * (B * C) = C * (A * B) - This means that it is associative
  • A = A * I 
  • I = A * A^-1
Matrix Multiplication Dimension
The dimensions of the end matrix of a matrix multiplication are the number of rows in the first matrix and the number of columns in the second matrix. So if we had a 3x2 matrix and a 2x5 matrix, the dimension of the final matrix is 3x5.

Transpose
When transposing a matrix, you convert each row of the matrix to its corresponding column, so the first row becomes the first column,etc. Transposing is denoted by a T.


Transforming 3D Vectors by Matrices
So you need to transform a vector by a specific matrix, well the first thing is to convert the vector into a matrix. There are two ways to do this, row major and column major.

For example, Vector A = {1, 2, 3} can either look like:

Row Major Version

Column Major Version
Depending on the kind of matrix you are multiplying by it makes sense to convert to that type of major. So if a matrix is intended to be multiplied by a row major matrix then convert it to that type of major. However, if that is not possible you can transpose the multiplaction matrix to multiply with the opposite major type.


x^1 = x * a + y * b + z * c
y^1 = x * d + y * e + z * f
z^1 = x * g + y * h + z * i


x^1 = a * x + b * y + c *z
y^1 = d * x + e * y + f * z
z^1 = g * x + h * y + i * z

So it actually doesn't matter which major is used but it is best to be consistent with which one is used throughout a game.

All images were created using https://www.codecogs.com/latex/eqneditor.php